How To Make a Bare Edison Bulb Chandelier

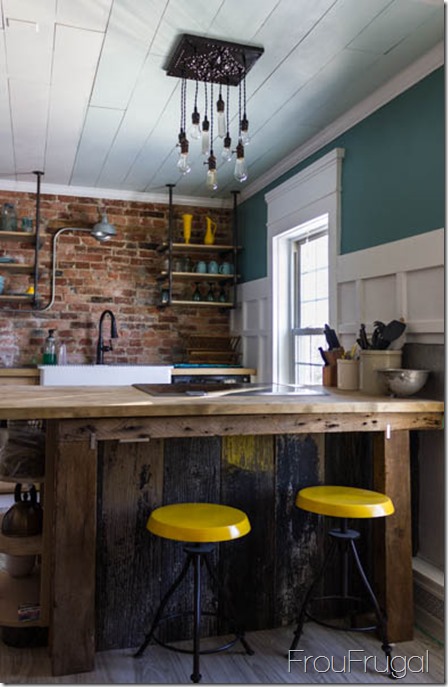
If you’ve been following my kitchen remodeling progress (summed up from last year here, and updated here, here, here, here and here) you may have seen the bare Edison bulb chandelier I made out of a framed ceiling tile I picked up at Goodwill for $4.99.

I usually do everything I can to pinch pennies in my projects. I had considered repurposing a light from Goodwill and calling it good. While I made one for nearly $700 less than my inspiration piece, it still cost me about $130 to make this chandelier.
This is a project that isn’t as hard as you may think. Today, I’ll show you how to make one.
First, you need to start with a base of some kind. Mine was a metal tile for $4.99 from Goodwill. When I found it, someone had attempted to spray paint it gold. I can only imagine they got rid of it when the gold turned out to be far less pretty than they imagined. It was hideous so, naturally, I forgot to snap a picture of just how bad it was. Trust me. It was ugly. If I didn’t know that salvation was just a spray can away (Krylon’s Oil-Rubbed Bronze), I would have passed this baby right on by.
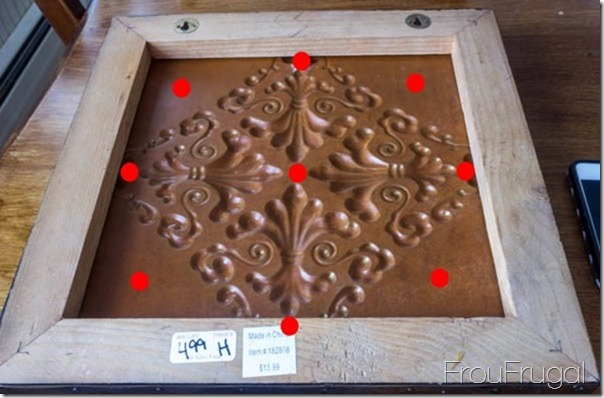
My tile is 14 inches square. I planned to use this light in my kitchen as the main light overhead light. I chose to put nine bulbs in it. The beauty of making your own chandelier is that you can pick and choose the base material and how many bulbs you use.
Here is where I put my bulbs.
I bought all of my supplies, except for some of the light bulbs at vintagewireandsupply.com. Now, this is not an affiliated or sponsored post in any way. They don’t know me from Adam, but I strongly encourage you to shop there first. They were quick with shipping, their site was easy to navigate and they even threw in an extra foot of wire for me and encouraged me to ask for any help I needed.
Finally, I’m not an electrician, but I did pester consult with one extensively and got his advice and instructions. If you have any questions or concerns, be sure to talk to an electrician before installing your own light.
Items you’ll need:
- Cloth-covered twisted electrical wire – 18 gauge
- Strain relief connectors – 2 per line
- Socket, either keyed or keyless depending on preference – 1 per line
- Varied light bulbs, 25-40 watts – 1 per line
- Wire Caps
- Electrical Tape
- Wire cutters
- Screws
- Drill
Step 1: Drill Holes
Mark where you want your lines to go and drill holes through your base. I had to go slow on my base since it was metal and spray painted and I didn’t want to accidentally have the drill get away from me and mess up my paint. Drilling through metal isn’t hard, but it’s a slower process than drilling through wood.
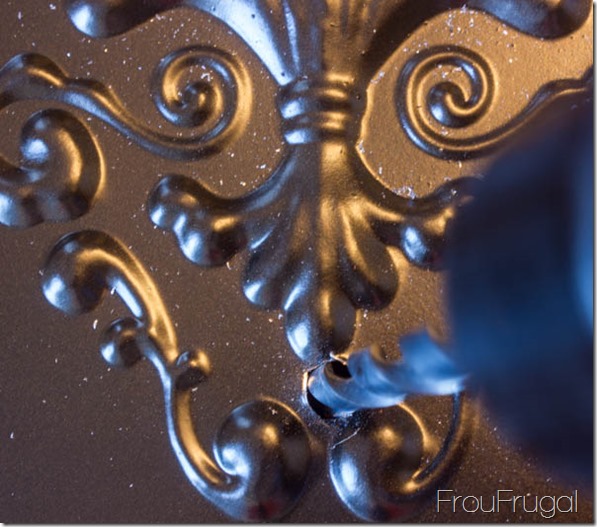
Your hole needs to be big enough for the strain-relief connector base to go through. The connectors come with a nut, but the shaft of the connector is not very deep. If your base is thick, you may need to get creative.
Step 2: Attach Strain-Relief Connectors
Once you have your holes drilled, insert one of the strain-relief connectors and secure it to the base.
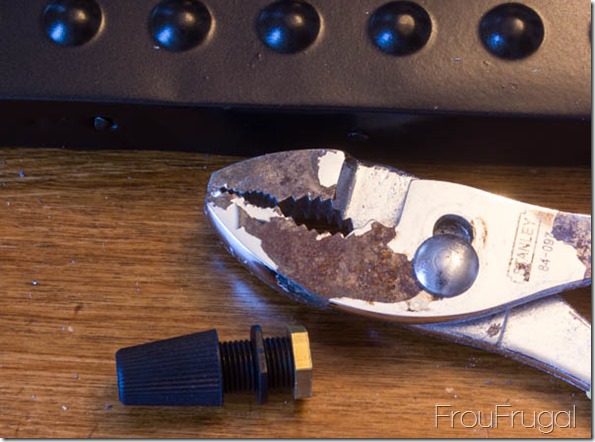
You can take the cap off before or after you attach the connectors to your base. See the little circle inside the cap in the picture below? That’s what the wire goes through. The end of the connector has spaces so that as the cap is tightened, it cinches the wire together. You will need to remove it before you insert your wire, but obviously, I had not done that yet in this picture.
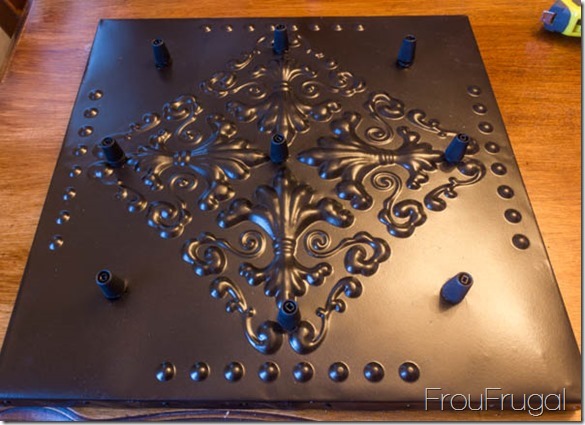
Step 3: Attach Wires
Cut the wires the desired length, plus an additional 8 inches (or whatever length you need for the dimensions of your base) for the back side. On the back side of your base, you will want your wires to all meet in the center. Once you know the position of your holes, measure the distance to the center of the base and add that to the length of your wires.
The length will vary per hole because some holes will be further from the center than others.
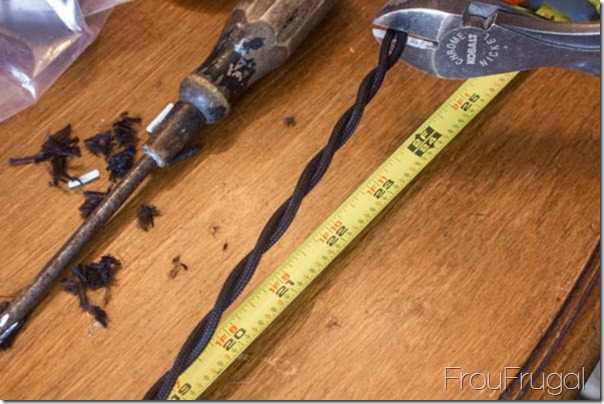
Here’s how my lengths ended up:

Thread your wire through the strain-relief connectors, thread the cap onto the wire on the right side of the wire. Before you tighten the cap down, measure your wire for the right hang length. This doesn’t have to be set in stone at this point. I played with my lengths after I got everything in place, but initially, I cinched these down just so I didn’t have wires moving all around on me as I was working.
Step 4: Strip Wire Ends and Attach Sockets
Cut back the cloth a good inch-and-a-half from the ends.
Now, I’m not recommending this next step to you, per se, but in the interest of full-disclosure, I used a lighter to heat the end of the cloth and melt it enough to keep it from fraying. I’ve done this countless times on different things so I’m very comfortable with doing this step.
I made sure to hold the cloth away from the wire when I melted it so nothing melted on my actual wires. It’s very quick step, but, again, it’s what I did and I’m not recommending it to you unless you feel absolutely comfortable that you can melt the cloth without damaging the plastic on the wires.
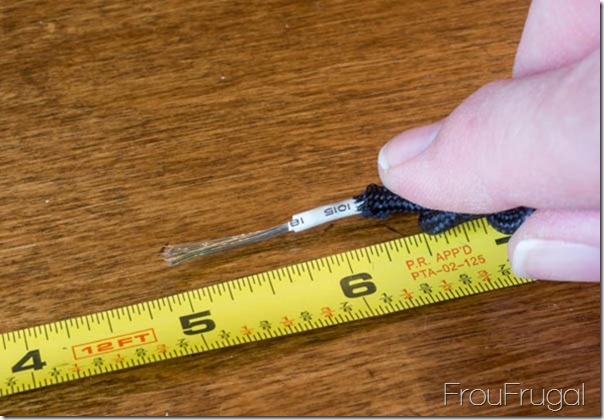
Before wiring your sockets, attach the strain-relief connectors to the base of the socket.
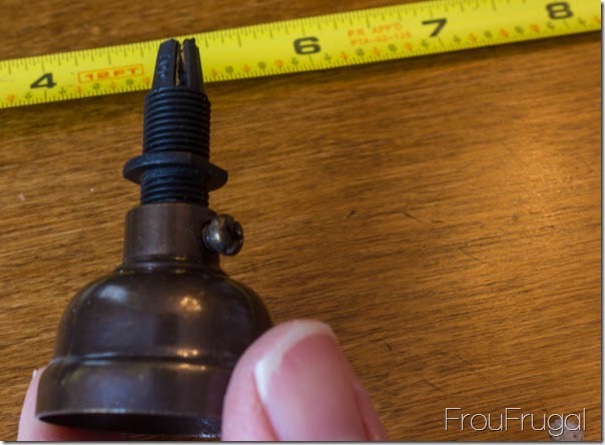
You can see in the picture below that the connector is screwed down tight to the socket base. Not all socket bases have a side screw. If they do, you may need to loosen it a bit to get the strain-relief connector on tightly.
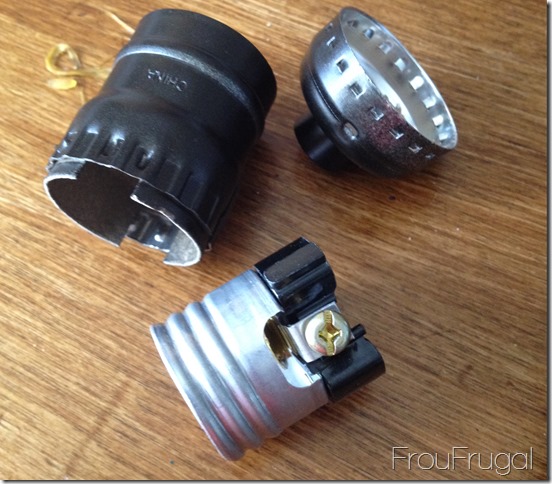
This is an important diagram to follow.
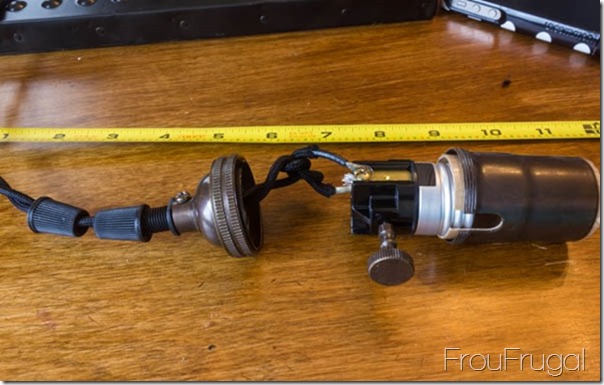
Starting from the left, you have the cap for the top strain-relief connector. Make sure the widest end is facing up. Next is the cap for the bottom strain relief connector, with the widest end facing down. Next is the socket base with the strain-relief connector attached.
The next step is to tie an underwriter’s knot in the wires. I like this video, if you don’t know how to tie one. Next, is your socket and, finally, is the socket sleeve.
In case you aren’t familiar with which parts I’m talking about, the base is in the top, right in the picture below. The socket is on the bottom. This is where your wires attach. The sleeve is on the left and it slides over the socket and attaches to the base. This particular one snaps together, but my keyed sockets screw together.
I spray painted my plain sockets with Krylon’s Oil-Rubbed Bronze spray paint before assembling everything. There was a bit of a smell when I first turned on the lights from the paint, but it quickly wore off. My keyed sockets came in an oil-rubbed bronze finish. I did not paint those ones.
Step 5: Wire the Sockets
There are plenty of diagrams online to show you how to wire your sockets. Electrical wire has a hot wire (mine was white, but sometimes they are ribbed instead of colored) and a neutral wire (mine was black).
You loosen the screw on the socket, wrap your wire around the screw and then tighten the screw. If find that twisting the wire before wrapping it around the screw base ensures all the little wires stay together.
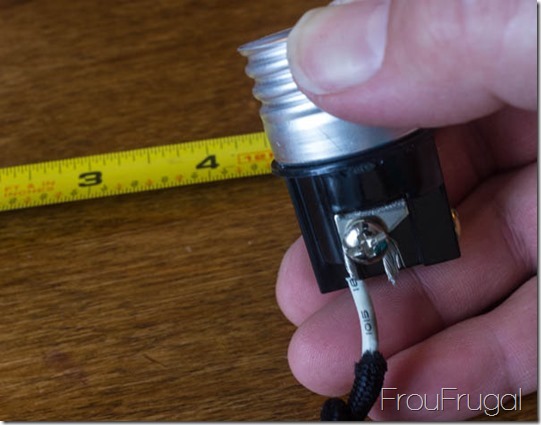
I took this picture to show how the wire looks on the screw, but this is actually wired to the wrong screw. The white (hot) wire should be attached to the brass (hot) terminal. Sorry for the mistake. Like I said, there are plenty of instructions online, and your sockets also come with wiring instructions. Be sure to follow them. I am not an electrician. I only play one on my blog. ![]()
Step 6: Join Wires Together
Once you have all the sockets wired and adjusted for length, you will need to join them together on the underside of your base.
It’s simply this, join all white wires together and join all black wires together.
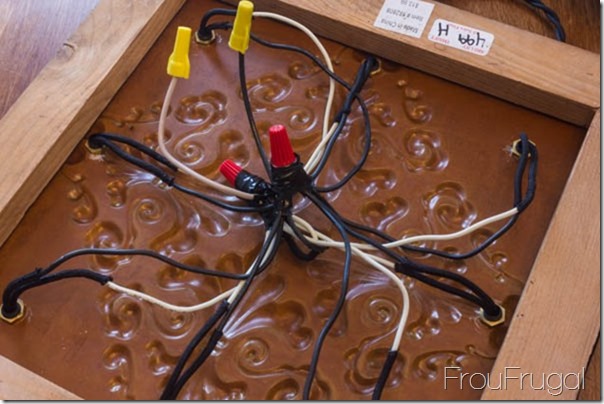
I am wiring this to my ceiling and I didn’t want to deal with multiple wires at the ceiling, I added an extra piece of wire to the group. It’s just a short piece of wire, called a pigtail, that connects the group of wires to the ceiling wire. The pigtails are the wires with the yellow caps on. The group of wires have the red caps.
I found it is easiest to group three wires together in a twist and then put those groupings into the cap and twist it on. Wrap your connections with plenty of electrical tape. You can see how far back I cut the cloth covering from the wire on this side. I didn’t want any of the covering near the connections.
Step 7: Wire to Ceiling Box and Secure to Ceiling
The final step is to wire the light fixture to the ceiling box and secure it to the ceiling. To connect the chandelier, I made sure the power to my ceiling fixture was turned off at my electrical box. Be safe, people. Turning the switch on the wall to off isn’t good enough. You need to make sure the main power is off to the outlet before you start touching wires.
Once the power is off, connecting the fixture is simply a matter of connecting the white pigtail to the white wire in the ceiling and the black pigtail wire to the black wire from the ceiling.
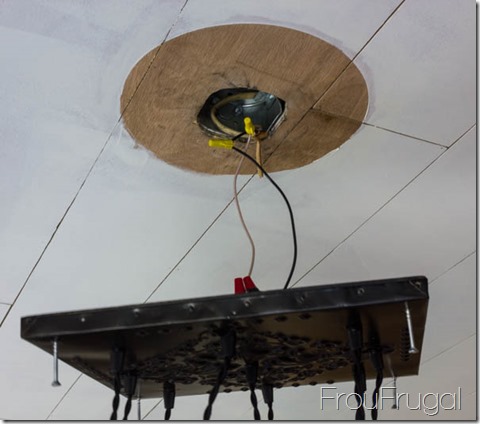
Before I attached the chandelier to the ceiling, I made sure to test it out to know that it worked. Once I knew everything was working, I wrapped the connections in the ceiling box (yellow caps) with some electrical tape.
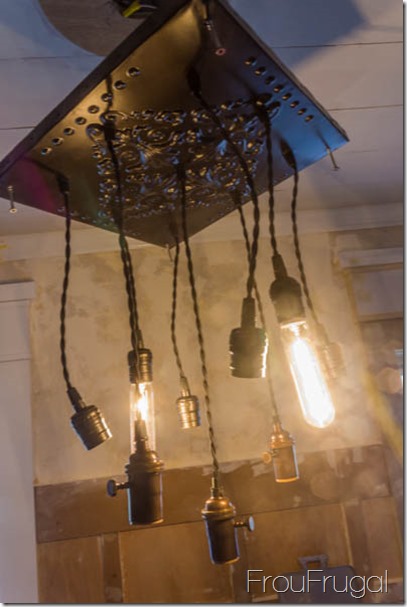
After that, it is just a matter of attaching the fixture to the ceiling.
My chandelier is really light weight, even with all the bulbs it doesn’t weigh more than a few pounds. You can see the weight of the fixture is easily supported by the wire connection alone.
I drilled some screws into the corners of my tile. I didn’t want to take the time to spray paint the screws. I colored them with a brown Sharpie marker I had nearby. It’s not perfect, but it’s close enough to blend in. The angle in this picture makes it look lighter than it really is.
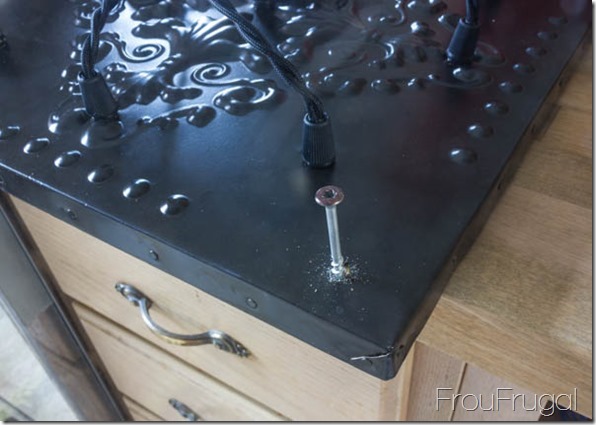
I simply screwed my screws into the ceiling and called it a “Done!” If your base is heavier than mine, you should look at anchor screws that have the proper weight bearing for your chandelier.
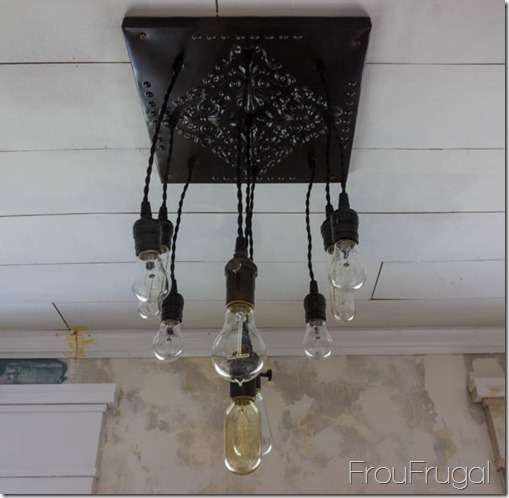
You can see the color of the screws in this picture. They don’t bug me enough for me to change them.
That’s really all there is to it. Screw in your light bulbs and light ‘er up! I used two test tube bulbs I bought locally for the shortest (9″) sockets. The four outside (11″) lights have 25 watt clear light bulbs I picked up at the hardware store. The three bulbs in the middle section are reproduction bulbs I got off of the vintagewireandsupply.com site. They are all 40-watt bulbs and I have them on the keyed sockets so they can be turned off if I want less light in the kitchen.
I don’t know why the center bulb has a yellow tint to the glass. All of these bulbs emit a very yellow light. If you don’t like that, you’re not going to be happy with the Edison bulbs, no matter how fun they look without being lit.
The truly fun part of this light fixture is how cool it looks at night. I don’t mind the yellow light in the kitchen. In the day, I have too much natural light coming in from the windows for the yellow to make much of a difference and at night, I actually like the warm, happy glow.

See how much yellower the reproduction bulbs are? The other bulbs are still produce a yellowish light, it’s just not as strong as the reproduction bulbs.
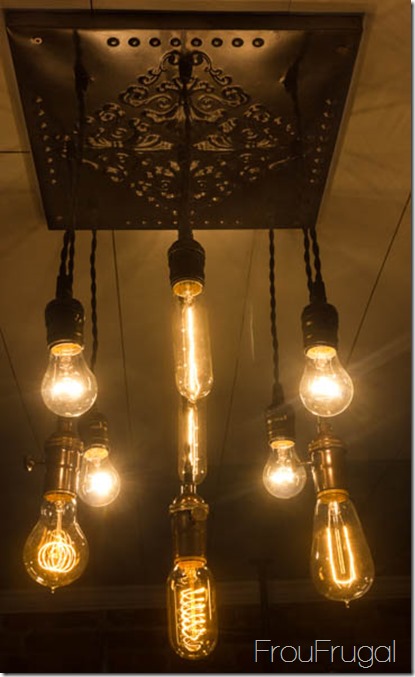
For $130, I have a unique, beautiful chandelier that compliments the look I’m trying to achieve in my kitchen with my remodel. We love it so much, both Hubs and I are talking about taking it with us when we move this summer. I suspect it will stay in the kitchen, but if it does, it will definitely be something I make again.
My kitchen is coming together, slowly but surely, and this light fixture really adds so much to the overall look and feel of the kitchen.
I’m entering this project in the Creating with the Stars 2014 contest by East Coast Creative. Be sure to check out all the great entries.
