Kitchen Update – Meh Edition
This week was complicated. And cold. And I’ve reached the point in the year in which I am emotionally done being a full-time caregiver to my special needs sister-in-law, Katie. I don’t know if it’s my depression rearing its ugly head or simply a case of the winter blahs, but I’ve been missing my Dad,

and missing my daughter. I have an app that is counting down the days until she returns home from her mission to Sacramento, California. Although, for the record, it is 2 months, 11 days 8 hours, 45 minutes and 10, 9, 8…seconds until she is home. I haven’t seen her since November 11, 2012. I’m ready to hug on my girl child.

I’m also missing Hubs.

He will actually be home in 15 days and 9 hours-ish. He’s been living in Utah since October. We’ve seen him monthly since then, but after Christmas we decided to go every other month. It’s crazy expensive to fly home every month. Two months apart is too long for me. He will be home on our 26th anniversary, though, for a long weekend, so that will be nice. Also, he will take Katie back to Utah with him when he goes back and she will live with her other brother’s family until we move there this summer.
At any rate, this is a kitchen update. Sometimes my productivity is directly impacted by my moods and life. Since our life has been complicated lately and my mood hasn’t been great, there’s not a lot to show for this week that is pretty. In fact, none of it is pretty yet.
I went from my pretty painted wall last week,

to more plaster patching this week.

I know, right? It almost made me cry to put more plaster over my pretty paint, but after living with it for a couple of days I knew I had to fix the issues that still remained. During the day, they weren’t so obvious, but at night they just looked terrible.
I wasn’t in a painting mood. I needed to do something truly creative, and design related. I absolutely love the challenge of trying to take a vision I have in my head and turning it into a reality. Let’s talk about the spot in the kitchen that I don’t really show that often. It’s the space to the right of the fridge area. In the beginning, it looked like this.

Oh my gosh. I still cringes every time I see that kitchen carpet! Ick. Anyhoo, see that cabinet on the right side of the picture? The one with the base cabinet underneath? That’s the area I’m talking about. When we pulled the carpet out, we had to remove all the cabinets because the carpet was laid down before the cabinets were installed.
Once we had the bases pulled, we did some reconfiguring which left this area without a base.

I had a roadside rescue table that was an okay fit here. The cabinet that was against the wall is now sporting a new glass door and there’s a small cabinet behind it that we moved from the wall behind the fridge.
I didn’t mind the table but it is very low and it really needed to be taller. Also, we have an issue with our garbage can. The issue being our dog who has learned how to turn it over when we leave, dig through it and trash my kitchen floor and spread garbage throughout the house. It’s so fun. It leads to us putting the garbage can on the counter when we leave the house.
I needed a solution. I decided this area could be a combination built-in garbage can area, microwave stand and dog food station. I mean, everyone needs one of those, amIright? Trust me. All the cool kids are doing it these days.

I found a cupboard door at Habitat for Humanities ReStore for $3 that seemed like the right size (I stopped on a whim and didn’t know the exact measurements of what I needed. I guessed right! Go me). Yesterday, I built a frame and cannibalized the table. I am doing this project with scrap wood I have from other projects. I’m even using pieces of wood that were in the basement and partially destroyed by our flood. (I was able to use the parts of the wood not water damaged).
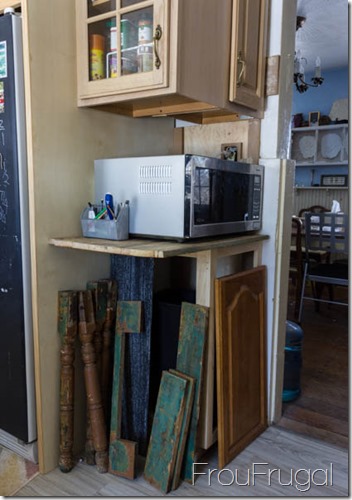
It’s not much to look at yet, but here’s where I ended things last night.
I am using only two of the legs from the table, but will cut off sections from the other two legs to make them tall enough. I will put a shelf in between the two pieces of legs which is where the dog food station will be. I am cutting the skirt boards of the former table and will make a drawer that will be to the left of the garbage can area.
The cupboard door, which technically matches our upper cabinet doors and not the lower ones, will tip outwards and the garbage can will sit in that space. We decided that hinging the door on the bottom and having it tip outward would make it harder for the dog to get into. He could easily paw the door open if we hinged it on the side.
I have enough leftover barn wood from my stove peninsula to put on the side of garbage area. You can see one of the pieces there. I will sand down the top and stain match it to the butcher block countertop we have in the kitchen.
Can you see it? I can totally see it in my head. It solves several problems in this kitchen in strange, but hopefully awesome, solution.
The height of the whole unit is the same as the rest of the counters in the kitchen, which makes the microwave much easier to use.

I realize the next owners may not want or need such a big microwave, but if they do, they will have space for it without having to take from the precious little counter space in this kitchen. I will paint the whole unit the Iron Ore – Sherwin Williams color that will go on all the base cabinets in my kitchen. All the upper cabinets and the fridge area will be white.


My instant gratification project for the week is still in progress. I made a swing out to Goodwill earlier in the week and picked up these yellow accents for the kitchen.

I know. They aren’t yellow in the picture, but they are mostly yellow now. I loved the color of the aqua-blue vase, but it is a greener shade than my new plates. It also has some discoloration on the back and a chip that needed to be fixed. I love the shape of it, though, and it looks pretty in yellow.
That’s it. I would like to have done more, but I’m happy with the progress on my microwave stand and hope that life uncomplicates itself toot-sweet so I can finish it up.
Have you seen what other Dueling DIYers are doing? Be sure to follow Sarah at The Ugly Duckling House and Carrie at Brick City Love to see their progress. Be sure to see what Kelly and Jessica have done to their kitchens this week.
Is it just me, or is anyone else ready for this crazy cold winter to be over?