From Chairs to A Bench
Last year I purchased a dark walnut dining room set in the hopes that I could refinish it and make it work for our family. It moved to the bottom of my To Do List while I worked on other projects. I finally realized the set wasn’t my style and I didn’t want to invest my energy into refinishing something I don’t love.
I’m still not sure what I’m going to do with the table, but I decided to turn the chairs into a garden bench. (We didn’t actually use the chair on the right, as I had another one with a better harp).

I’m sorry for the dark pictures. We did this project in the basement during the cold months.

I enlisted Hubs help in the project. I took the captain’s chair and removed the arms, the center bar, the back of the chair, and the front skirt piece. I used some photo editing magic to show you what parts I used.
Since dining room chairs typically get wider from the back to the front, I needed to shorten the center bar and the front skirt piece so that the chairs backs would sit tightly together. That chipped section you see in the front skirt piece in the photo above was cut off in this process.

We used zip ties to hold things together while we measured the center bar and the skirting.
Once we had these pieces cut, we started putting it together. We used our doweling kit to help us make the joins. The kit has everything you need to sink the dowel pins into skirting and center bar. Using the dowel pins gives a nice, strong join.
We attached the side of one full chair to the side of the captain’s chair back. Hubs ran a bead of Gorilla Wood glue down the length and then clamped the two sides together. Once they were clamped, he drilled out some pilot holes and sunk a couple of screws to hold the pieces together.
When everything was glued in place, Hubs used his handy-dandy Boy Scoutmaster knot-tying techniques to hold it all together while it dried. This is a good alternative to bar clamps, which we’ve never gotten around to buying, mostly because Hubs ties it all up so tightly, we’ve never needed them.
I didn’t get any pictures of this step, but I borrowed one from the web that looks very similar to what Hubs does. (Click on the picture to get details of how to do this).
We let everything dry and then I got sidetracked by my foot surgery. In fact, I didn’t go downstairs for close to 2.5 months! I finally had the boys bring this up to the garage for me so I could finish it up.
I bought some boards for the seat. Twice. Which made me cranky for a good day or so.
Okay, let me pause for a Public Service Announcement to remind you that just because you bought boards that are 1” thick x 8” wide, do not be fooled into thinking that 8” + 8” = 16”! In Hardware Land, just because they SAY they are that big, does NOT mean it’s true. Think of it as the name of the board and not the size.
Why? Because a 1’” x 8” board is that big when they cut the lumber. But then they plane the boards to make them all the smooth and even and that shaves off some of the wood. So it’s really a .75” x 7.5” board and 7.5”+7.5” does not equal 16”. Why they don’t change the “name” to reflect the actual size is one of life’s great mysteries.
Anyhoo, after returning the wrong boards and buying the correct size, Hubs and I got to work fitting them to the seat. It was pretty straight-forward. We laid the boards on the seat and marked them from underneath to know where to make the cuts.
We couldn’t find our counter-sink drill bit, which makes it so the head of the screw doesn’t stick up. Hubs used a large bit the size of the screw head to drill into the wood a bit and that worked fine. You can see the holes in the boards in the picture below.
I sanded down the edges and rounded the corners of the boards.
Next, we attached the arms to the bench. I was going to try and do a pocket join for the arms, but Hubs argued that we didn’t really need to do that, since we were going to paint the bench and can just fill the holes before we paint.
Next came all the standard steps. Fill holes, sand, prime and paint.
Our basement flooded this winter due to some freak conditions. I thought everything had dried out, but when the boys brought the bench up, I noticed some mold on it. I used 2 cans of Kilz to prime the bench after I cleaned it up, but I probably could have used a third can.
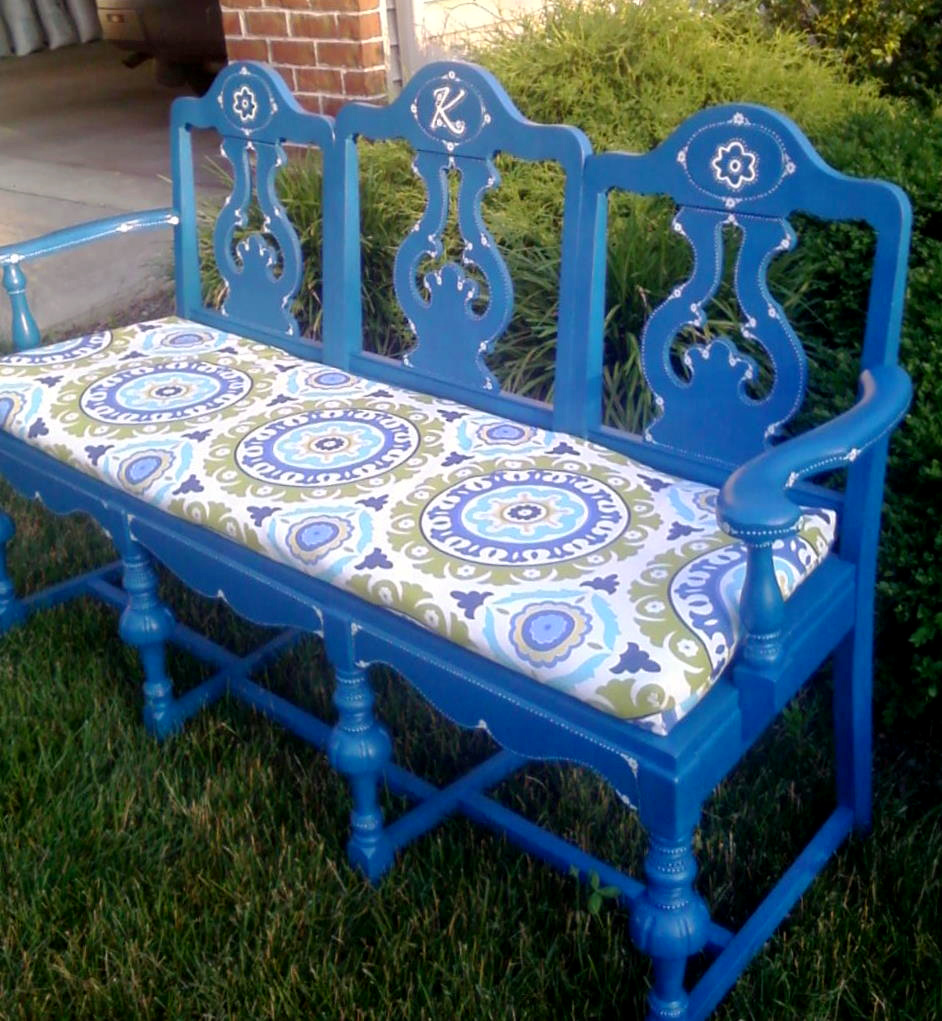
I picked out a bright blue for the bench. It’s called, Sapphire Sparkle.

I bought 2 sample jars of the Behr Premium Plus paint and primer and used a paint brush to paint it on. I’m not going to lie, it was hard to paint into all the detail work on the chair and not get drips. However, I can never use spray paint without getting drips, either, so I went with the cheaper route.
When you’re using a deep color like this, be prepared to paint several coats on. Keep your layers thin and know that every coat will even out the coverage. The picture above is after one coat of paint.
This is with three coats of paint. I used 2 sample jars on the bench and have enough left for any touchups that may be needed.
If you’re a regular follower, you know I can’t leave well enough alone. I wanted to Frouf it up a bit and came up with some embellishments to the harp. The flower motif is from the fabric I chose for the seat cushion. If you follow me on Facebook, you can see the pictures there.

I also repeated the pattern on the skirting and around the posts.
I’ll show you the seat cushion in my next post, but I need your input. Do you think I should add anything to the oval plaque areas, or should I leave them be? I’m thinking they need something, but I can’t figure out what to do.
I’ll seal it with some poly once I decide if I’m going to add more embellishments or not.
Cost Breakdown:
-
Chairs – Owned
-
2 Boards (1” x 10” x 6’) – $12.90
-
2 Cans Kilz Primer – $10.96
-
2 Samples Behr Premium Paint – $5.88
-
1 Can Minwax Helmsman Spray Urethane – $8.64
Total Project Cost – $38.38