Double-Wide Dresser Redo
Hold on folks, this is one long post, but I promise it’ll be worth it!
On today’s agenda is this massive, Big Bertha of a dresser that Hubs and I inherited from his folks.
It’s a bad photo, I know. It’s the only one I could find of the before shot, though. It’s a double-wide pine dresser that was stained a cedar color. I’m guessing it’s from the 1940’s or so. It’s nearly as tall as it is wide. It’s 4’8” wide by 4’3” tall! It’s huge.
A move to our new home bumped this redo to the top of my list. I’d been thinking about what I wanted to do with Bertha for a long time. Awhile back, my youngest sister, Dani, had asked me for some ideas for her dresser. I created a pinboard for her, and I started collecting images of dressers I loved, along with other ideas for her home.
Imagine if you will if this dresser…

and this dresser…

got married and had a gargantuan baby.
What would you have?
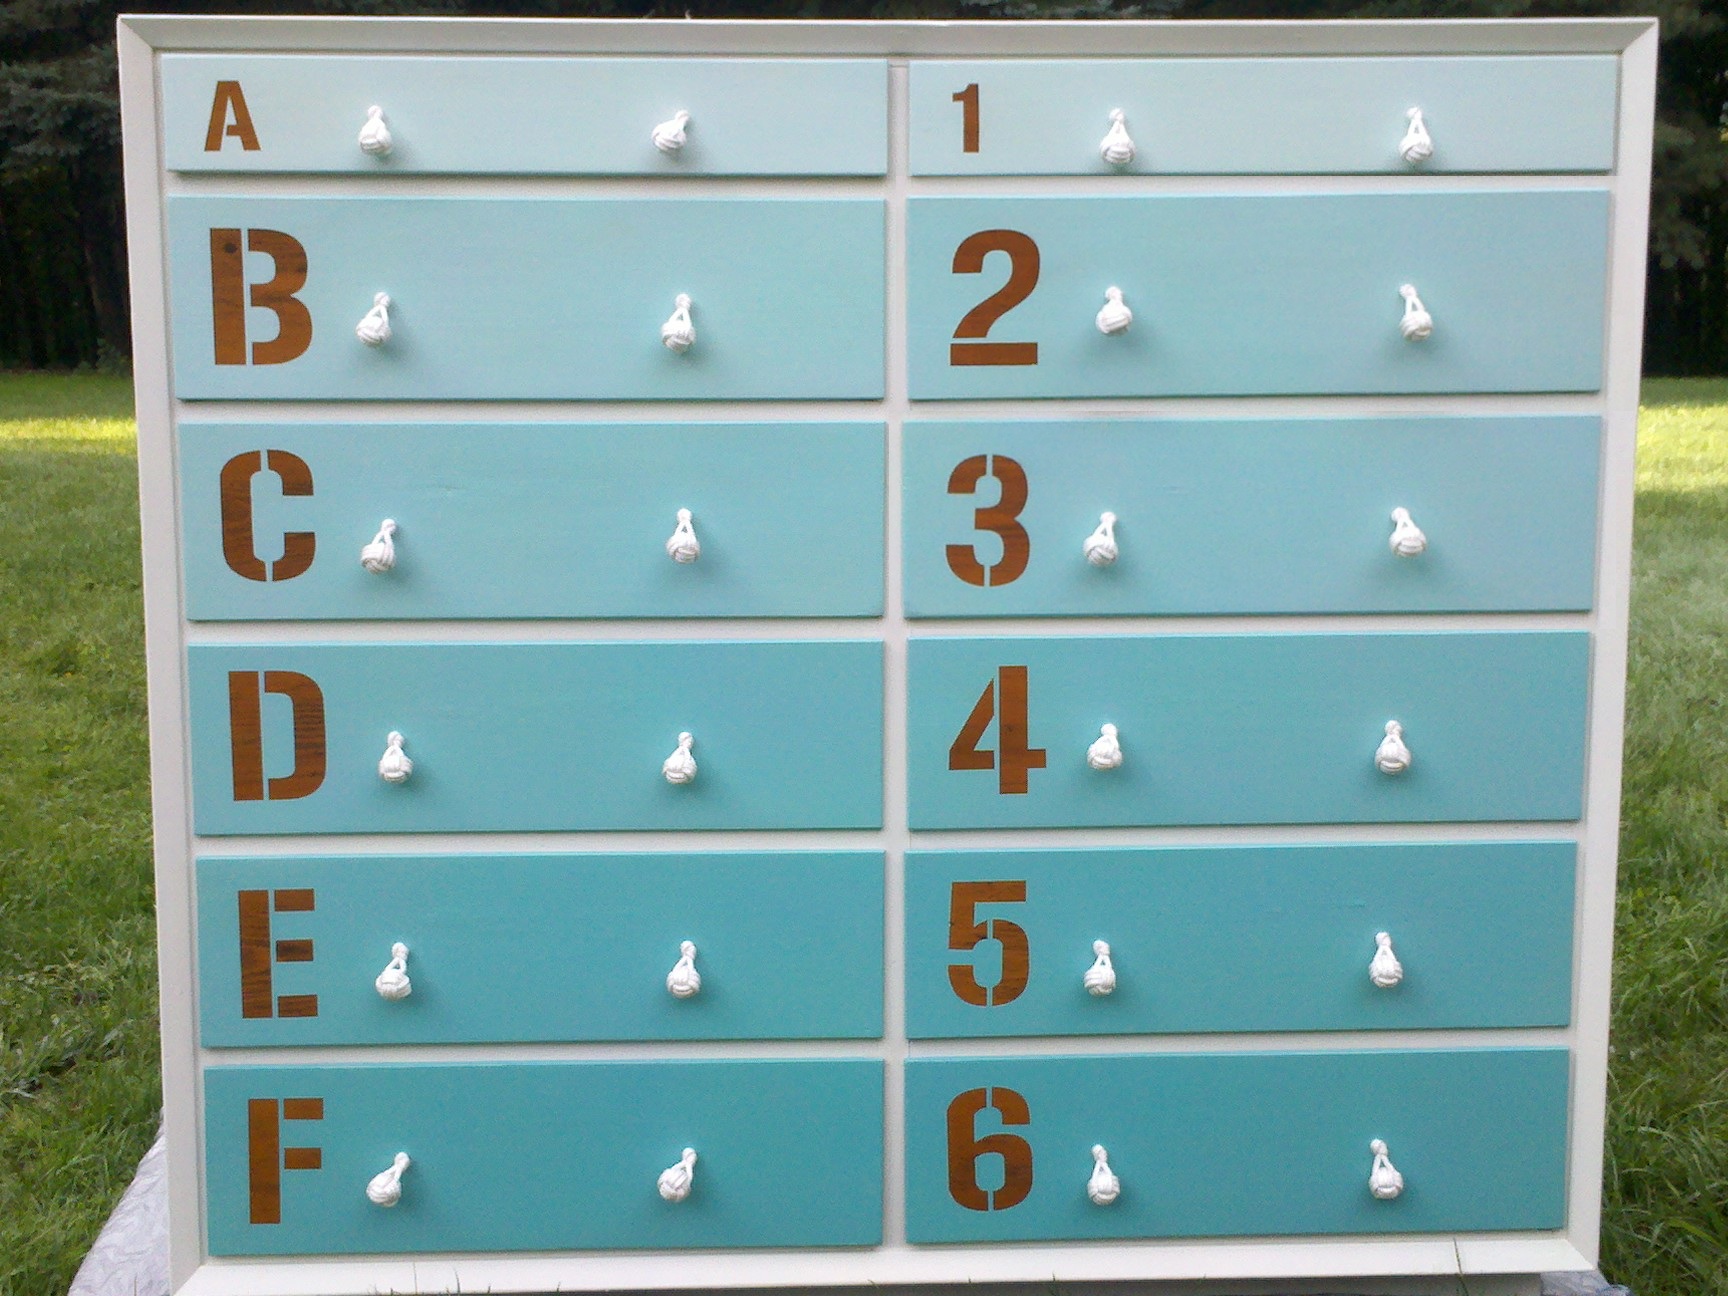
Ta Da!
I present my newest creation. Bertha became a total Betty!
Want to see the drawer pulls? They are monkey fist pulls.
I made them using regular clothesline rope and a wood bead for the center. I have a tutorial coming soon about how to make them.
If you want the details, feel free to read on, but again, this is a long post.
I made several mistakes along the way. Let me share them with you, so you don’t have to go down the same road I did.
Mistake 1: ALWAYS prime a stained piece with oil-based primer. I used KILZ.
I bought a couple of tester jars of Behr’s Premium Plus Ultra paint and primer in one in the color, White Fur. I happily painted it on (without having primed) only to discover bleed through.
Even though the Behr paint has primer in it, it is a latex primer and not an oil-based primer. It makes a difference when trying to cover stained furniture. I’ve read where people have painted on 4 coats of latex primer before painting, but I just don’t want to do that much painting.
I hate painting enough as it is. I’d much rather paint on one coat of the right primer and call it good. After I fixed this mistake, I repainted with the Behr paint.
All better!
Mistake 2: NEVER take furniture outside when the humidity is high.
We created a workspace area for me in my new barn. And I love it. But, the wood on the drawers swelled during the high humidity of August in Ohio.
To say I had to do copious amounts of sanding to fix the problem would be understating the fact.
I had to sand the rails between the drawers. I had to sand the tops of the drawers. I had to sand the bottom of the drawers. I even rubbed them all down with some wax to help things slide along. Sand, test to see if drawers fit back in the dresser, sand, repeat.
After I was able to get the drawers back into the dresser, I moved the dresser back inside to finish it up. Now that the swelling is down, the drawers slide nice and easy.
Mistake 3: Don’t bother trying to match stain.
I tried using my trick of mixing acrylics in a color similar to the stain and painting it on the open wood before staining. It didn’t work this time. Look at the third drawer on the left. It really grabbed the new stain.
Originally, I was hoping to leave the drawers stained and do the letters and numbers in a thinned white. When I realized that was never going to look like I wanted, I switched ideas and went for a reverse stencil (also known as a mask) with the gradient drawers.
Mistake 4: Line up your stencils/mask before you paint.
This was the hardest part. I had a hard time seeing the brown vinyl on the brown drawer. I’d definitely use a contrasting vinyl from my drawers if I ever do this again.
What happens when you’re not as accurate as you like?
Can you see the flub? It is kind of hard to tell from the pictures, and it may sound like I’m being nit-picky. But the six is slightly askew. It’s not hard to tell in real life.
Betty has her flaws and imperfections. Who among us doesn’t? Is Betty any less beautiful for having them? I submit to you that she is not. She is gorgeous just as she is.
Mistake 5: Don’t forget to score the edges of the stencil/mask before removing.
The white on the left happened because I didn’t score the edges.
I just lightly ran my blade around the edges of the stencil before I peeled it off. It greatly reduced my need for touch ups.
Tip: Make sure you save a bit of paint in each shade for any touch-ups you may need.
Here’s a few other pointers.
Old Pulls:
To get rid of the pulls, I had to unscrew them from the inside.
The pulls must have been glued down before they were screwed on. Also, they were attached before the piece was stained and shellacked, so it required a bit of force to get them off.
Once the pulls were gone, I puttied the holes
and then sanded them down.
Gradient:
For the gradient, I started by painting the bottom (F/6) drawers with True Value’s Color Made Simple testers in the Fairytale color. I added 1 teaspoon of Behr’s White Fur to the paint the E/5 drawers.
On the third drawer up, I realized the change in color was too subtle with just 1 teaspoon of white each time. Instead, I added 1.5 teaspoons for the D/4 drawers, then 2 teaspoons for the C/3 drawers, then 2.5 teaspoons for B/2 and, finally, 3 teaspoons for the A/1 drawers.
I did two coats of paint for each drawer and I barely had enough by the final drawer. I didn’t think to save a bit of paint, so I’m really hoping I never have to do any touch ups.
Finish:
Since, the Behr sample pots only come in a flat finish, you’ll want some sort of sealer to finish off the piece. I used two coats of Minwax Paste Finishing Wax.
See the difference the wax makes in the sheen? It’s so pretty and gives the furniture a beautiful, hand-rubbed shine.
Liner:
I Mod-Podged in some leftover wrapping paper to line the drawers. It gives a fun pop of color.
My craft room in by no means ready for a reveal. The walls are pink. There’s bunny wallpaper on them.
I have a bunch of projects ahead of my office redo, but I went ahead and styled the dresser.
I have my old press box with my stamp pads on the top. I put some glass jars filled with beads and glass on top of some of my vintage doily collection.

This box was an old hardware box that belonged to Hubs’ grandpa.

I tied up some old comic books on a bed of feathers in my wire cloche. The box below it was a gift from one of my sisters.
Some of my favorite pictures of my kiddos (I still need to find one of Buddy), a favorite saying and a stoneware bowl:
And because it was so very long ago, here is the before:
After:
Cost Breakdown:
-
Dresser – Free
-
Paint – $11.81
-
Primer – $6.72
-
Stain – $4.31
-
Clothesline – $13.23
-
Wood Beads – $4.41
-
Vinyl Stencil/Mask, Paste Wax, Wrapping Paper, Mod Podge – On hand
Total Project Cost: $40.48
Total Project Time – Far Too Long due to too many mistakes