If you want to learn how to emboss pictures frames, you’ve come to the right place. Today I’m going to show you how to emboss on a flat wood picture frame using the cake decorator style of embossing, aka The Piping Method.
Here’s what you’ll need to start:
- Smart Non-Shrink Wall Fix

- Cake decorating bag and tips
- Picture frame or other wood piece to be embossed. I picked one up at a thrift store, but you can find a similar frame here.
Step 1 – Mixing the Wall Fix
I bought the Wall Fix at Lowes for about $7. I wanted the non-shrink type because traditional Spackle, Joint Compound and other types of products tend to crack when used in thick layers. The wall fix has a very dry texture compared to Joint Compound. In fact, I thought there was a problem with the jar I got the first time I opened it. That is simply the texture of the product.
I put a large spoonful in a bowl and added some water to it. Trust me on this point – unless you have the death grip of a sumo wrestler, you’ll need to water down this product to get it out of a decorator’s bag. I added too much water to this batch and had to add some more Wall Fix.
Start small. Add a few drops of water at a time. You have to work quickly with this stuff, so you want to make small batches of it at a time. Once it starts to harden, your hand is going to get very sore.
You’ll want to make it the consistency of frosting, but maybe a teensy bit wetter. You’re not going to get the crisp texture line you get with royal icing. If you got it thick enough to give you the details, you’d have a hard time getting it out of the bag. Stick with a small circle tip and make sure you have the Wall Fix thin enough to work with, but thick enough to hold it’s shape. You’re going to have to play with it a bit to know what I mean.
Step 2 – Preparing The Decorating Bag and Tip
To be totally honest, I didn’t actually use the tips for this project, due to a freak garbage disposal accident (or three) that wiped out my supply of tips. I filled the bag and snipped off the tip to give me the size of the opening I wanted. If you don’t have the decorator bag and tips, you can use a quart freezer bag and cut off the tip. I like the freezer baggies because they are a thicker plastic than the sandwich bags and you need the support of a stronger plastic for this project. Start small on how much you cut off as you can always cut off more if you need to.
I have since bought some replacement tips and I will say that you get a cleaner line with the tips. Plus, you can use the edge to the tip against the wood when making the designs, which can help if you are writing.
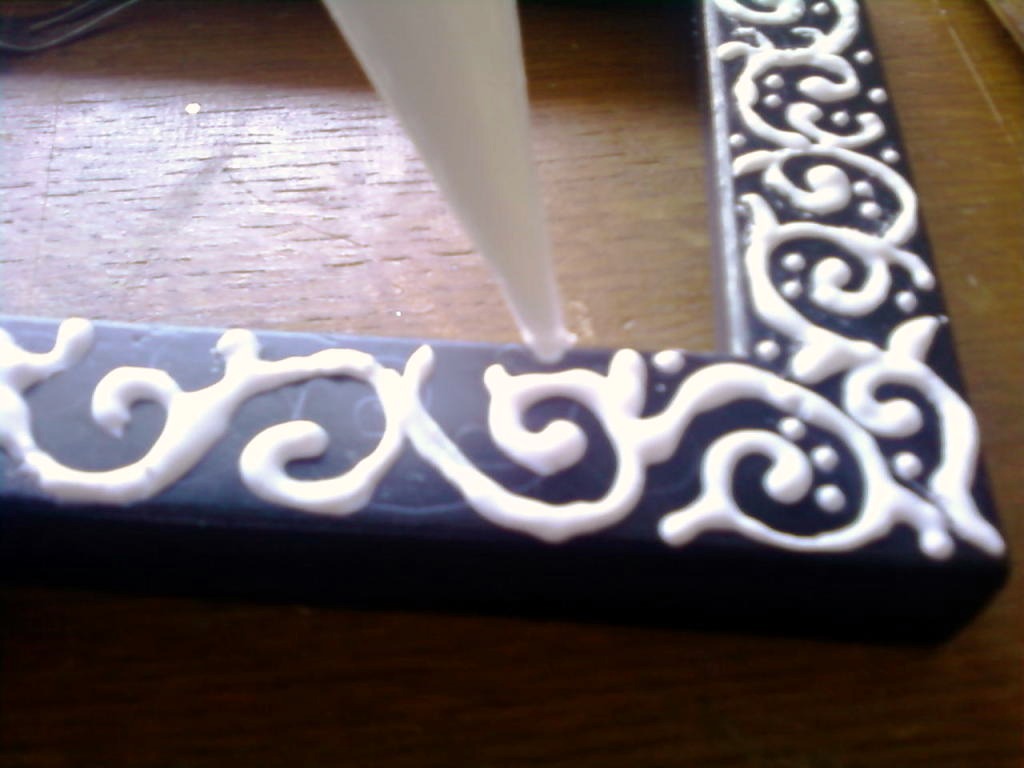
Step 3 – Piping the Design
Prep your wood piece. You need to make sure it’s free from any dirt or grease. If you have a shiny surface, I’d sand it a bit to give the Wall Fix something to grab onto. I had already painted my frame when I decided to use it for this project. I was using this frame for some vintage hors d’oeuvres spoons and forks, so I wanted to mimic the pattern on the silverware.
I began by sketching it on the frame with a pencil. Once I had an idea of how it was going to look, I didn’t even finish sketching it. I just grabbed the bag and started piping it on.
You can see how the whole frame looks before I painted it.
I’m not a great piper. There are some places where this design runs amok. But overall, I was happy with how it turned out. The Wall Fix doesn’t always come out smoothly. I kept a toothpick on hand and used it to kind of clean up the design and move it around a bit. The toothpick will help you take off areas where you get too much Wall Fix on and to move extra Wall Fix from one area to another. Just pipe some, fix it if necessary, and then pipe some more.
Let the Wall Fix dry for a couple of hours and then paint it. I used Krylon’s Oil Rubbed Bronze Spray Paint (ORB), one of my go to colors.
You can go for a subtle look and leave the embossing as is. Because I was framing the silverware that has a golden patina to it, I really wanted to tie it all together. To really make the details pop on the frame, I broke out my little tube of Rub ‘n Buff. It comes in a bunch of metallic finishes.
I used Antique Gold for this project because I think it pairs well with the ORB.
This stuff is amazing. Just a little touch goes a long way. Use a very light hand to put it on. You can always add more, but taking it back off…not so much, unless you want to repaint. Since it’s 17 degrees in Ohio right now, I’m trying to avoid any kind of painting.
You can rub it on with your finger, but I use a rag (old t-shirt) that I wrap tightly around my finger. Just a little spot of the Rub ‘n Buff on the shirt and you’re in business. Seriously, a small touch of the Rub ‘n Buff goes a long way. If you have the size of a grain of rice, you have too much.
I rubbed it along the embossing, as well as around the edge of the frame. If this were a piece that would get some use, I’d seal it afterwards with Poly Acrylic. For this project, I skipped the sealing step.
Click the picture to see the finished project – Framed Cocktail Flatware
There you have it. How to emboss wood using the Piping Method.
Cost Breakdown:
Smart Wall Fix – $6.98
Cake Decorating Bag & Tips – $12.99
Krylon Oil-Rubbed Bronze Spray Paint – $2.97
Rub ‘n Buff – $3.99
Total Supplies Cost – $26.93
Disclaimer: The opinions stated in this tutorial are my own. No one paid me or even donated their products to me. That said, please note this post contains affiliate links, which means that I may get a commissions if you decide to purchase anything through any of the provided links. I only recommend products & systems that I use and love myself from companies that offer a fair price on their products, so I know you’ll be in good hands.