Kitchen Update – Crossing Things Off
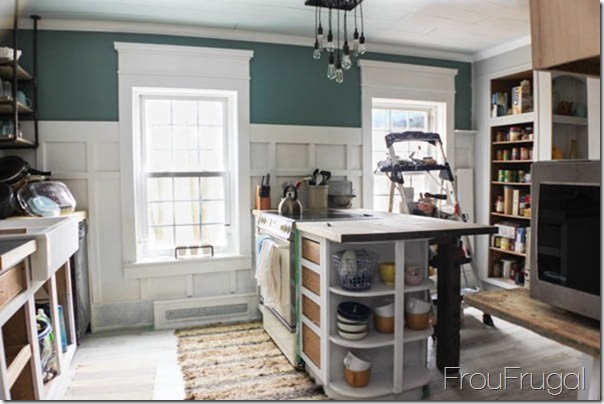
Last week, I didn’t update things because I basically hadn’t gotten much done. A lot of the work I did was the detail stuff you don’t really see in pictures. The only thing really noticeable consisted of finishing the radiator cover that Hubs had started for me before he went back to Utah.

Excuse the cell phone pic. I snapped a picture to prove to Hubs I completed it. Can I just pause for a moment to tell you how excited I am to have finished this? I thought it would be fun to see show you how far this particular area in the kitchen has come.
Let’s start with the before pictures.

This is where it all started. Notice how short the windows are in comparison to the cabinet. My goal in this kitchen was simply to remove the wallpaper and the carpet. Little did I know that was harder than I imagined it would be.
When we began demoing this wall, we realized all the wallpaper was on a false wall. Basically, someone put furring strips over the plaster over brick wall, slapped up some 1/4″ plywood and wallpapered over it.

By doing so they ruined the old window casings. Once we pulled everything off, the damage underneath was extensive.
Peeling paint, damaged plaster, mold on the walls, chunks missing from the plaster due to the nails which ended up looking like bullet holes.

This is where the new cover now is. This area had the most damage with all the plaster gone and the brick showing through.

It was this section and the extensive damage here that led me to the decision to install board and batten. I did not want to fix that much plaster and felt like the board and batten would add some nice architectural detail to the kitchen.
Here is what the wall looked like after the demolition in January of 2013 and before any real fixes.

You can see the termite/wood rot damage on the lintel above the window on the left.

That’s all been replaced and fixed, now but it led to the “big hole that stayed around for far too long. By April of 2013, we had progressed to this point.

For more than a year, I have been looking at some kind of damage or place that needed to be fixed on this wall. By December of 2013, our vision was starting to form

Today, it’s still not finished, but for the first time, I can finally see the light at the end of the tunnel, and it is a wonderful feeling.
Even with the cupboard doors missing, only one coat of primer on the bases and the baseboard, my dishes drying on the rack and the ladder in the room, it is glorious! Gah! It makes me want to hustle up and finish the painting.
Because of how the cupboards meet the board and batten, I need to finish painting the board and batten before I paint the bases. It will be easier to tape off that area then doing it the other way around. So while I’m itching to see my dark, moody gray go on the bases, I need to do things in the right order.
To get to this point, I had a long list of things I had to do, as evidenced by my refrigerator note.

One of the big steps I did during the last two weeks was to fix the window trim. The window trim was a mess.

After we trimmed out the windows, it looked like this.

Somehow, I lost the pictures I took with the filler piece. Basically, I cut a piece of wood to fill the space from the chopped off sill to the casing edge. Then, I tried (and failed miserably) to find a half-round trim piece to fit the edge of my fill piece. The rest of the windows in the house are trimmed that way and I was trying to achieve that look without completely redoing the window sill.

After my epic hunt for trim was a bust, I finally bought two sticks of quarter round because third grade math taught me that two quarters equal one half. Some wood glue, a few brads shot through the biggest parts of the trim and some car Bondo later, and I now have this window.

Why car Bondo? Well, I’d heard from several professional carpenters that this is what they use to fill large gaps. Even with the trim pieces cut, I had large gaps to fill. There have been places in this kitchen where I’ve used regular wood putty to fill some large gaps and almost without fail the putty has cracked.
To use wood putty for large fills, you need to do a little at a time, let it dry and build it up gradually. Ain’t nobody got time for that! Car Bondo is stinky, but let me tell you what, it’s rock hard dry in about five minutes. FIVE MINUTES!!!! It sands down the same as putty and no one is the wiser.
I used the Bondo to fill the holes from the hardware on all the cabinet doors and drawers. My new hardware doesn’t match the old holes. I also used it on my built-in garbage door.

I got the cabinet door for $3 at The ReStore and I’m guessing these two sets of hinge holes are the reason. Easy enough to fix with Bondo. They are now completely filled and baby smooth and ready for paint. If someone wants more details on how to use Bondo, I will work up a post on it. It’s seriously a great fix for large holes.
Between the Bondo, wood putty and caulking, I’ve been doing a lot of prep work which involved things like caulk, sand, more caulk, sand, putty, sand, Bondo, sand, putty, sand, Bondo, sand, plaster, sand. It’s been very messy in my world. My arm is quite angry with me, but progress is being made.

The pantry used to be in the right corner where the wire rack is and the walls were equally atrocious.

For the record, I was not chosen for the Creating with the Stars contest by East Coast Creative (so many great projects!), but HAD I been selected, I was going to make this shelf for this area as my upcycled project. I still plan to make it, but it will be on my time table now and not the contests.

See that darker area on the side of the cabinet, just above the baseboard? Bondo. Cabinets are sometimes made so the side of the cabinets is particle board with fake wood-looking contact-type paper on the sides. My fake stuff was pretty beat up so I cut 1/4″ plywood to cover it. The plywood is just thick enough to fit on the ends behind the real wood on the front of the cabinet.
No matter how many times I measured and cut the plywood for this cabinet, I got it wrong because of how uneven the floors and wall are in this spot. After messing up repeatedly, I finally used the best I had, but it left me with a gap at the bottom of the cupboard above the baseboard that was about 1/8″ on the left side and about 5/8″ on the right. Bondo to the rescue!
Even though it’s just primer and the cupboards will eventually be a dark color, I am really loving the uniformity of color on the cabinets. It’s an exciting step and I’m happy that I’m pretty much down to the painting. Granted, I HATE painting and with a hand that frequently goes numb whenever I’m using it, painting is even less fun than usual.
That said, I’m going to push through. The excitement of finally seeing my vision come to life is strong enough to overcome those little challenges.

On a final note, I picked up a couple of yellow items for my kitchen, both of which are more than just cute yellow items.

The jug seriously looks like a beehive to me. Hubs started his own hive this year and since we have absolutely no plans to move a hive across country with us, a friend is going to take it off our hands. I thought this would be a nice reminder of his short-lived time as a bee keeper.
The other is the chicken. I gave up my girls this fall when Hubs left for Utah. I didn’t need the additional responsibility of them and after the winter we’ve had, I can only say how happy I am that we sold them when we did. We will try and have a few chickens in Utah but until then, I love this cute little chicken.
Ignore the dust covering everything. It’s the bane of my existence these days. I will dust when I’m done sanding.
Progress is a very, very good thing.
