Plank Ceiling Progress
Hubs came home from Utah this weekend and we finished up the work on the ceiling project.

The fact that he was interested in helping me knock out this project during his short time at home really meant a lot to me. It’s definitely a two-person job. When we first started doing this project last month, we got as far as the light and then stopped. Neither of us were in the mood to tackle removing the fan and figuring out the light situation so it has stayed in this state for the last month.
We removed the fan which ended up being less of a hassle than we thought. This fan is the only circulation in the kitchen so I hate to take it out, but it’s too low for the space. Our ceilings are only 7’9" tall and even with a hugger ceiling fan, the clearance on the fan is below the code height of 7′. I didn’t take pictures of the steps for moving the electrical box for the light fixture. Sorry about that, but there was a lot of raining plaster and dust and I didn’t want to try to take pictures of that.
The electrical for the ceiling fan is centered in the room, but this makes the light off center to the cupboards and the stove peninsula. We moved it down to be centered over the stove area. We have an old boob light there now as a temporary fixture until we can get a permanent one for the space.

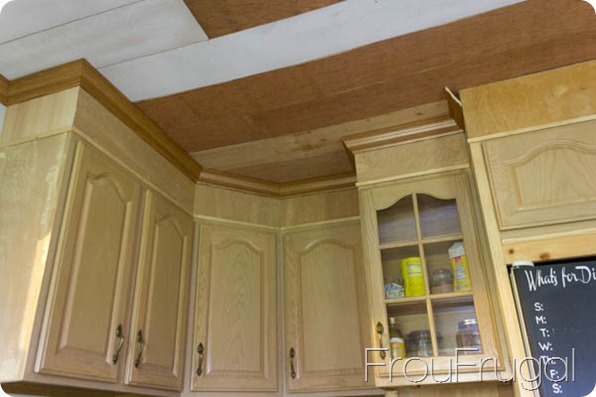
Once the ceiling is painted, that junction box won’t be so obvious. As for attaching the ceiling planks, it was pretty straightforward. When we first started the process, we used a nickel to try and keep the spacing consistent. However, that soon proved to be difficult to do.
I’ve said it before but it bears repeating, nothing in this house is straight, plumb or level. After 164 years, things settle, sag and get out of alignment, if they were ever truly in alignment in the first place. It probably didn’t help that the planks we used on the ceiling were ones we cut from a 4′ x 8′ piece of 1/4" underlayment. We cut the planks 7 3/4" wide. When you are ripping your own boards from a piece of plywood, chances are there’s going to be some uneven cuts. The weight of the plywood tends to pull it off-center toward the end of the cut.
We discovered how hard it was to keep the grooves the same width all the way down the length of the board when we don’t have perfectly straight boards and perfectly straight walls or ceiling. Instead, we went with the "charming" method wherein we eyeballed the spacing as best we could and then declared the varying gap widths "charming" and moved on. Perfect this house ain’t, but it’s got charm oozing out of every pore.
Hubs wanted me to be sure to tell you the above picture is misleading. With 8′ length boards, this project requires a couple sets of hands to do. Since I was taking the picture, you only see Hubs holding the board up and on small boards you can get away with that. Just know that if you tackle this project, you will need a couple of people to really pull it off, or you will need to work with shorter lengths.
Day 1 was spent moving the electrical and hanging the rest of the cut boards that we had. Once we got the electrical moved, getting the rest of the boards up went fairly quickly. We did need to rip two more sheets of plywood on Day 2 to finish the job. We also had to break out our angle tool from our Kreg Crown Mold Jig to help us in this section.

True confession time, I screwed up the cut on the first board there, which is why you see the back side of the underlayment on that one. We weren’t sure if we had enough boards to fix this and since the ceiling is going to be painted we let the back side show and made it work. We figured out that marking the angles on the back side of the board and then cutting them out worked better and we managed to fill in the rest of the space without any more mistakes.

Sure, we probably should have put all the ceiling planks up before extending the tops of the cupboards. That would have been the smarter way to go about this, but that meant I would have had to wait for Hubs’ schedule to free up and, clearly, that didn’t happen as we needed it to.
Projects like these often test the limits of our patience with each other. Maybe it was because we’d just been apart for 2 weeks or maybe we are just better at working together, but we finished all of this up without any marital discord and that is a win in my book.
On Monday before Hubs left, I had him help me cut the trim for around the top of the cabinets. I only bought 3 sticks of 8′ crown and had burned up most of one piece trimming out the top of the pantry/shelf area. It may or may not have taken me a couple of tries to remember how to use the crown jig.

Hubs’ brain is much better at these kind of things than mine is. We found a good rhythm to getting this done and about 2 hours later we had used up all the trim and brad nails we had on hand.
We have quite the War of the Wood Tones going on in our kitchen right now. If you are wondering why we chose this color of crown molding, allow me to illustrate.

I wanted the white crown, but not for $3.86 more per 8′ piece. I am very confused why there is such a huge price difference in the colors of this trim. It’s exactly the same in every way except for the color. I’m being frugal so I’m not shelling out the big bucks for "real" crown molding. I purchased the $6.09 Ultra Oak Crown. This is a polystyrene molding that, once painted, you can’t tell the difference between it and wood crown.
My pocket book sure knows the difference, though. The primed pine version of this molding is $11.34 per 8′ length and the MDF version is $15.12 for an 8′ stick. I will need a total of 9 pieces for the entire kitchen. That’s a significant difference in price.
All of these versions would still have to be painted to match my trim color regardless of price. I figured the savings on the total cost of the crown molding was worth the extra step of priming the crown before painting it. That’s how much I saved over the cheapest white version. I saved even more by not going with the more expensive materials. I guess if people were going to get up close and personal with my crown molding I might care a bit about the quality of the materials. Trust me, though, it all looks the same painted.
Here is where we stand today.

I had started priming some of the boards last fall when I was going to use these planks as flooring. I changed my mind on that project before I finished priming which is why some are primed and some aren’t. I ended up liking the wider width of board for the kitchen.
Kreg has yet to discover my awesomeness and sponsor my blog so I am under no obligation to sing their praises. That said, the Kreg Crown-Pro tool really does make things simple for cutting crown once you figure it out. The only problem we had when using the tool was that our tool did not come with the stickers that attach to the front to remind you which way to set it up for the varying cuts. I had a picture on my phone from the manual (which I lost) that I referenced before each cut to make sure we were on track.
Their angle finder tool made all the difference in getting tight cuts. For a house where all the angles are off, this made a big difference in how tightly our pieces fit together. The only thing the instructions were not very clear about, nor were any of the videos, was how to measure your boards.
We found that you want to measure along the bottom of the board and mark it. You cut the molding with the bottom side up and the bottom of the molding is what rests against the wall so its just easier to make those measurements along the bottom of the molding.

I decided to "help" Hubs out with the cutting and I screwed up the piece for the front of the fridge. So much for helping! We didn’t have enough trim left to redo this so I will finish that off once my budget loosens up enough again to let me buy things for the kitchen project. Remember, I’m trying to only do projects this month with materials I have on hand.

When using the Kreg Crown-Pro tool, you have to understand the difference between inside and outside cuts and their left/right variations. This can get kind of confusing. Trust me. You want to pay attention to the difference.

I remember it best if I remember to look at the corner as my center mark. Look at the trim piece right above the words in this picture. That piece of trim was 23 3/4" long. We had to make a right, outside corner cut on the LEFT side of the board, and a left, inside corner cut on the RIGHT side of the board and the board is upside down when you cut it so it can get even more confusing.
It took both of us reminding each other which cut we were making to keep everything straight. You can see how easy it was for me to get confused when I tried to do it on my own. All the cuts that are left to do are pretty simple so I should be able to get the rest of this done before Hubs’ next trip home, which isn’t until Thanksgiving.
Okay, I just knocked out three more things on my list which leaves me with still a lot to do in the next week.
-
Finish epoxy sealing the counters
-
Water seal the brick wall
-
Replace missing bricks in kitchen wall
-
Grout behind sink
-
Fill 10 bajillionty holes with wood putty in board and batten in kitchen.
-
Caulk my life away in the kitchen
-
Patch walls in kitchen
-
Cut plywood for kitchen ceiling planks
-
Remove ceiling fan in kitchen and replace light
-
Hang light above kitchen sink
-
Remove cupboard door hardware and fill holes
-
Fill holes and prep cupboards for paint
-
Find paint color for lower cupboards
-
Prime board and batten
-
Fill crack along stair runner
-
Caulk stairs
-
Prime stairs
-
Paint stairs
-
Install pad for stairs
-
Install stair runner
Clearly, I need to step up my game. I have pulled a bunch of paint swatches for number 13, but I haven’t found the right shade yet. I’ve made good progress on number 5 and I will knock the rest of that out today along with number 2, 7 and 11. I probably won’t get everything done on my list before the end of the month, but I still like having the list to keep myself accountable.
Hopefully, I will have some good progress to show you by the end of the week. Do you ever need to put a project on hold until you have someone to help you with it? Do you ever have get confused while working on a project or is that just me?